I’m a bit overwhelmed by just how much mail running a review blog generates. Every few days there are new boxes to open, email receipts of delivery to send, and project scheduling to do.
I was introduced to TICO Bricks at the New York Toy Fair. When I emailed their US distributor, The Lazy Dog & Co., they were happy to send me my pie-in-the-sky wishlist item. TICO stands for Tiny, Intelligent, Combination and Originality, I’m really looking forward to seeing how this build stands up to this wonderful motto! Follow this link to my YouTube Channel where I’ll host my videos until I can upgrade WordPress.
Disclosure: I received a complimentary brick kit from the manufacturer in exchange for review. The opinions are my own.
Thanks for reading, and please click the Follow Button under my profile on the right side of the page. To support posts like this in the future, consider joining my Patreon!
After many suggestions and with SC’s help, I’ve started my Patreon. I know the blog is new and we’re still growing but there’s been some interest in our videos. We also want to help others create content on a shoestring.
(SC Edit: From personal experience, half of what we do was done by someone else who blogged about it. Making videos about “How did you two do that?!”, and providing them for free is a perfect form of “Pay it forward”. To provide video content for free, financial support helps (I work 40+ hours/week, I help PuzzlePaws in my spare time).
Individuals who support PuzzlePaws via Patreon will get benefits based on the level of their contribution including: Content from me (the Spouse-Critter), First-look content (before it is available on the blog), exclusive content, and access to giveaways (we can’t keep ALL these puzzles/coloring books/kits, no matter what PuzzlePaws would like to do!))
I was in Washington DC last weekend, working for a friend as a vendor at Otakon®. Otakon® was my very first anime convention way back in 2001, and I was thrilled to go again. DC is full of fantastic national monuments, but the one everyone recognizes is 1600 Pennsylvania Avenue, AKA The White House.
Brick kits are a great way to keep my mind active when my body rebels. Nanoblock® kits are perfect because they are so small! I’ve assembled them in bed or on the couch with a lap desk; and with the micro-scale of the builds, I don’t have to worry about the build overflowing my work surface. I had not done The White House kit before, but with a difficulty of 2/5, I wasn’t overly worried.
Ack! White pieces on a white board. This will not work……SC made me a black work board! Much better!
Nanoblock® kits come with very little extraneous packaging. The pieces are in small plastic bags, presorted by size and type. There is also an incredibly detailed and easy to follow building instructions.Set up was easy; open all the plastic bags, grab some tweezers, and put on an audiobook.
What followed was a few hours of quiet, detail-focused fun! SC had set up my camera so that I could create a slideshow of the building process.
This slideshow requires JavaScript.
Pretty cool, right? It starts slow, but builds up quickly! And at the end, I have a nifty little souvenir of my latest trip for my Around the World shelf!
The kit includes an itty bitty Nanoid of the 45th president.Extra pieces were included, which is great. With kits this small, breakage or piece losses are inevitable.Hurricane acting as Godzilla, great scale model!
My Rating: 5/5
Brick Kit SPECS
Company: Kawada
US Distributer: Schylling
Title: The White House
Kit Number: NBH-144
Year released: 2017
Pieces: 420
Difficulty: 2/5
Brick Size: 4mm x 4mm x 5mm
Figure size: 1.5cm
Finished size: 8cm x 8cm x 4.2cm with the flag, the height is 5.5cm
Made from ABS Plastic
Made in China
QUALITY:
Box: lightweight, 14cmx14cmx4.5cm
Build Integrity: Very Good, the trees and flag are a bit fragile
Recognizability: Excellent
Piece shapes: Standard brick shapes
Piece Fit: Good, small noticeable gaps along brick lines
Notes: The instructions recommend the Nanoblock branded tweezers, but I don’t own a set and found that angle tip tweezers work just fine. As there are extra pieces provided, I recommend saving them with the instructions in a sealed bag.
Disability Notes: Due to the fine motor control required for this build, I do not recommend Nanoblock® for those with fine motor control impediments, arthritis, or palsy, unless you have assistance. If you have a visual impairment, this is possible to do with the assistance of a magnifier.
Where to buy: The White House is available on the Schylling website for $19.99 usd. It and other Nanoblock® kits can also be found at your local Barnes & Noble.
Disclosure: I received a complimentary puzzle from the manufacturer in exchange for review. The opinions are my own.
Thanks for reading, and please click the Follow Button under my profile on the right side of the page. To support posts like this in the future, consider joining my Patreon!
I normally wouldn’t have chosen this puzzle for myself. It’s a 500 piece, which is within my current ability, and the subject matter is cat-based…But Spouse-Critter (SC) fell in love with both the tigers and the idea of hidden images. I tend to shy away from both hidden images (the Magic Eye™ images give me vertigo) and glow in the dark ones. That being said, how could I tell SC no? He rarely steers me wrong.
I love how well protected the puzzle pieces are!
There were only a few hanging chads, and it’s obvious that the die stamp had gotten dull rather than a design flaw. The chipboard is made of recycled materials, and the pieces are of medium thickness.
I had a bit of trouble keeping the cats off my tigers! We did find that one of the images on the side of the box is meant to be seen when upside down, so you can use the box to store puzzle pieces and still see the image!
Once I had my frame in place, the assembly only took me a few hours, spaced out over some rainy days. The mix of standard and irregular pieces made for a great mental exercise. Matching stripes took what felt like forever!
It came out so pretty!Low light glowIt reallly glows!!!
It took some experimenting to get the glow to pop, those rainy overcast days hadn’t given off enough light. I got limited results with a led lantern, so SC went out and bought a black light bulb. Look at the glowy awesome!! The box says there are 16 tigers in the puzzle. I could only find 14, but as I mentioned before, I suck at finding hidden images. The ones I did find look amazing.
PUZZLE SPECS
Company: MasterPieces® Inc.
Title: Hidden Images Glow in the Dark Jungle Pride
Artist: Steve Read
Year released: 2017
Pieces: 500
Cut-Style: Grid-cut puzzle
Finished size: 15 x 21 in
Bonus poster: No
Made from recycled materials
Made in China
QUALITY:
Box: Sturdy but lightweight, 8 x 8 inches
Board: Medium thickness, recycled chipboard
Cut: Cut with a steelcut die, very few pieces were not fully separated
Image Quality: Excellent, great color saturation
Finish: Slightly glossy with sandy texture where the glow in the dark ink is
Puzzle Dust: Minimal
Piece shapes: A good mix of traditionally cut and irregular pieces
Piece Fit: Very good, small clusters of pieces could be moved without falling apart
Disclosure: I received a complimentary puzzle from the manufacturer in exchange for review. The opinions are my own.
Thanks for reading, and please click the Follow Button under my profile on the right side of the page. To support posts like this in the future, consider joining my Patreon!
I finished assembling a puzzle today and the Spouse-Critter(SC) liked it enough to request it be glued. As I had received both the puzzle and a package of puzzle glue sheets from MasterPieces; I figured why not? This turned into an adventure!
First, I had to move my “helper”.
I’ve never used glue sheets before, so I was rather excited. Would it be easier than the liquid glue I normally use? It had to be faster, right? So I flipped my puzzle upside down and got to work.
Hmm….this can’t be right. The puzzle is a 500 piece measuring 15″ by 21″. The packaging states that it will cover two (2) 500 piece puzzles and that with eleven sheets out of the twelve in the package to cover my puzzle certainly isn’t happening here.
I stopped and did a little research. The packaging says the glue sheets are 7″ by 7.5″. My measurements,with Hurricane for scale, say they are 6.5″ by 6.5″. Now, the company’s website states the sheets are 6.75″ by 6.75″. OK, maybe I got new product in older packaging. It sucks, but I do have enough to cover my puzzle. (SC Edit: Turns out, the packaging is 7″ by 7.5″. The issue seems to be a communication error between designer and manufacturer.)
The hardest part is getting the backing to peel. I did this on a good hand day, where I had sensation in my fingers and it was difficult. I honestly couldn’t imagine how hard it would be for my friends with major hand mobility issues. Maybe an easy-peel corner? Other than some wrinkles, my first piece went on really well. Color me impressed, these glue sheets are super sticky! All the other main sheets(6) went down easily. I laid full sheets across the top and bottom of my puzzle, thinking that those would be the areas needing the most support. This left a strip down one side and one down the center that still needed glue sheets. The uncovered areas were all under 2″ wide, so I cut 2″strips from two additional glue sheets. Ha! I was able to cover my puzzle completely using only eight sheets instead of the estimated eleven. I still have four sheets to use if I want to save one of my micro puzzles.
Rating: 4/5
Pros:
Much less messy than glue
Fast application
Zero drying time
No chemical scent for people with Chemical Sensitivities
Cons:
Hard to open
No way to reposition-once it’s down, it’s down!
Measurement discrepancy-measure your puzzle first!
Cost. See Cost Analysis
Cost Analysis:
I know I’m not the only disabled person on a limited budget. At $5.99 a package, MasterPieces Peel & Stick Puzzle Glue Sheets are great if you only need to save one or two puzzles. If you are like me, and save a good number of puzzles; then the same cost covers a small bottle of liquid puzzle glue that will do four or more puzzles.
Overall:
I’ll email Masterpieces regarding the size discrepancy, and recommend an easy peel corner or perforation to make opening the glue sheets easier. They have an awesome guarantee system and I’ll post an update about what I hear. I solidly rate this product a 4 out of 5 and do recommend it for puzzlers who either hate glue or have a Chemical Sensitivity.
MasterPieces Peel & Stick Puzzle Glue Sheets can be bought here.
Disclosure: I received a complimentary puzzle and glue sheets from the manufacturer in exchange for review. The opinions are my own.
Thanks for reading, and please click the Follow Button under my profile on the right side of the page. To support posts like this in the future, consider joining my Patreon!
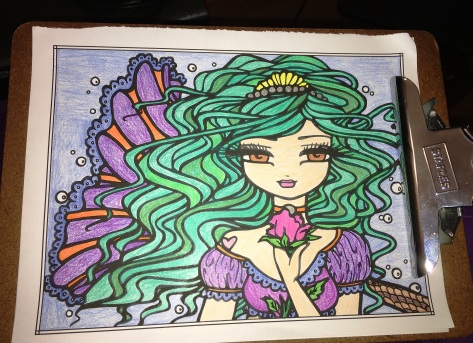
I love coloring, have for years. I used to drive both my college professors and my D&D groups crazy. I’ve always found coloring a way to destress, even before the Adult Coloring craze caught on.
Unfortunately for me, today it rained for the umpteenth time. Seriously, its been raining everyday for the last two weeks! I’m ready to build an ark. That being said, while my hands feel like they’ve swollen into paws, it was National Coloring Book Day. I had to color.
I decided to highlight the awesome art of Hannah Lynn Art and Design. She has a ton of coloring books out and one in production that I’m lusting over. I like Hannah’s art style because each book has pages of varying difficulty and an iconic BESM style. If you don’t know what BESM is, either you don’t watch anime, play tabletop games or need to go here.
I chose the above images to color because they have similar composition. I wanted to contrast different coloring media.
Fragile Heart by Hannah Lynn
Crayola® crayons. There’s a reason these are where everyone starts out. I’m happy with my final result, the coloring went quickly and my hands didn’t hate me.
Ocean Rose by Hannah Lynn
Crayola® colored pencils. Most coloring books for adults recommend these, but my hands reminded me why mine had been gathering dust in the drawer. Ouch!
Easter Lily Fairy by Hannah Lynn
Rikota® Brush Marker and Prismacolor Premier® Brush Marker. I loved this. The colors popped and my hands didn’t hate me. I was reminded that I really need to invest in more brush-style markers. There’s a little curling on the edges due to the wetness of the medium, but it will go away after a few hours under a heavy book.
Overall…I call today a success! If you like the art featured, I suggest either following Hannah Lynn’s FaceBook or visiting her website.
P.S. Who got the two anime references in today’s pictures?
P.P.S Obligatory cat picture
Disclaimer: All opinions expressed on this post are my own.
Thanks for reading, and please click the Follow Button under my profile on the right side of the page. To support posts like this in the future, consider joining my Patreon!
I love puzzles, I do. Puzzles are both brain-food and art. I love to assemble puzzles, but on their own, puzzles as art is ephemeral. Thus…Glue! There are now a ton of different ways to preserve a puzzle, and I’ll most likely do posts on them as I try them. But, when I grew up, the only option was glue.
I tried a few different brands until I found Mod Podge. I love this stuff! They have nearly a dozen variations now, but I tend to stick to either Matte or Satin. Satin is my go-to. It goes on smooth, and if I take my time, the brush strokes disappear.
Anyways, my process for gluing a puzzle is simple.
I assemble my puzzles on a piece of foam board. I cut out enough wax paper to cover the whole puzzle. Tape these together with a good bit of overlap on the edges.
Place the wax paper over the image side of the puzzle and top with a second foam board.
With the puzzle sandwiched in between the foam boards, flip it upside down.
Now it’s time for Mod Podge! Much like with painting, always keep a wet edge. Which means; once you start, you have to finish! I start by laying a thin line of Mod Podge the entire length of the top about 2 inches from the edge.
Using a paintbrush(I like these thick foam ones), spread the Mod Podge in an even layer with long strokes. Don’t worry, it starts white, but dries clear. Continue to add lines of Mod Podge and brush it across the puzzle until it is completely covered.
Then set it aside in a warm, dry place where it will not be disturbed. Because I have cats, this is usually my laundry room. It only takes about 20-30 minutes to dry, but I like to wait a day in between coats. I recommend at least 2 coats on the back and one on the front. To remove any stickiness, Mod Podge’s website recommends finishing with an acrylic urethane spray. I haven’t tried that yet, once I do, I’ll update this post with my opinion.
Disclosure: I bought the Mod Podge featured in this post. All opinions are my own.
Thanks for reading, and please click the Follow Button under my profile on the right side of the page. To support posts like this in the future, consider joining my Patreon!
I was at my local Walmart a few weeks ago after my last convention and found this little gem!
I have always loved the Jurassic Park franchise. I binge-read Michael Crichton’s first book in the series one summer day in 1993 in preparation of the theatrical release. It took me the better part of a day, and 2 loose teeth. I was twelve and absolutely in love.
Twenty- some odd year later, I’m still in love. Dinosaurs are great, and Velociraptors are amazing! This little polybag was a joy to make, and a pain in the rump to film. Since my blog is still new, and I’m not planning to upgrade to a paid plan for a while yet; I had to post the video on my FaceBook Page. I warn you, it’s rough, but it’s a start! I thoroughly blame @photo_kat for the “rawr..chomp chomp”
I had a great time, and now own my very own Baby Blue!
If you have a build you’d like to see me do, or review, let me know! Tell me what you think, that’s what the comment section is for.
Thanks for reading, and please click the Follow Button under my profile on the right side of the page. To support posts like this in the future, consider joining my Patreon!
Early last February, I got to go to the New York Toy Fair. This was an awesome weekend where I got to see the new toys, games, and hobby kits that companies would be selling over the upcoming year. While there, I was gifted a veritable plethora of swag. Swag is great, it’s the free stuff that companies give out in the hopes you’ll spread the news and buy more stuff. At the time, I had no real plans for the swag, which included puzzles, micro-brick kits, and bath bomb kits. Then winter hit me, and hit me hard. I spent the better part of two months staring at the ceiling, too ill to leave to bed. I watched a lot of Netflix. Honestly, I watched so much that I became bored with boredom. It’s summer now, but nothing, especially good health doesn’t last long. My spouse-critter (SC) recommended I start a blog, talk about the things I love. My body may have bad days/weeks, but my brain still craves stimulation, and I certainly can’t be the only one!
Back on topic, one of those Toy Fair Puzzles was this:
My family and friends will agree…I’m obsessed with sharks. Discovery Channel’s Shark Week is sacred holiday in my house. What better way to build this puzzle than to marathon watching Shark Week’s 30th Anniversary season?
So I set up my work station, AKA the couch and bought a season pass on Amazon. The cats decided this was to be a family project. Zane tests the box for sits as Teedle warms my spot.
This is a new brand to me, and I was really impressed. While there were a few pieces that weren’t fully separated during the cutting process, the overall quality of this puzzle is excellent. The irregularly cut pieces, mixed with traditional ones, made for a fiendishly clever puzzle. Featuring nearly 30 sharks from over 25 different species; this puzzle is almost more educational than Shark Week! Better yet, my FAVORITE shark is on it. Spotted Wobbegong FTW!All finished, and beautiful!Hurricane gave it the Cat Seal™ of approval as Zoomie supervises.
Okay, enough cat photos. Here’s the details!
PUZZLE SPECS
Company: Eurographics Puzzles
Title: Sharks
Artist: Unknown
Year released: Unknown
Pieces: 1000
Cut-Style: Grid-cut puzzle
Finished size: 26.5 x 19.25 in
Bonus poster: No
Made from recycled board and printed with vegetable based ink.
Made in USA
QUALITY:
Box: sturdy, sized 14 x 10 in
Board: Very sturdy and rigid
Cut: Cut with a steelcut die, very few pieces were not fully separated
Image Quality: Excellent
Finish: Slightly glossy
Puzzle Dust: Minimal
Piece shapes: A good mix of traditionally cut and irregular pieces
Piece Fit: Very good, small clusters of pieces could be moved without falling apart
Where to buy: At the time of this post, “Sharks” is listed for sale on the Eurographics website for $17.99 usd.
Disclosure: I received a complimentary puzzle from the manufacturer in exchange for review. The opinions are my own.
Thanks for reading, and please click the Follow Button under my profile on the right side of the page. To support posts like this in the future, consider joining my Patreon!
Welcome to my new venture. I will be reviewing puzzles, coloring books, and building brick kits that could be of interest to individuals whose minds are sharp, but their mobility is limited. There will be adventures — and cats, as mine get into everything.
I am currently working on my first puzzle to be reviewed while watching Shark Week 2018. I assure you, the puzzle is appropriately themed!
#puzzlepaws #sharkweek2018
Thanks for reading, and please click the Follow Button under my profile on the right side of the page. To support posts like this in the future, consider joining my Patreon!


 I had not done The White House kit before, but with a difficulty of 2/5, I wasn’t overly worried.

 Set up was easy; open all the plastic bags, grab some tweezers, and put on an audiobook.


 Other than some wrinkles, my first piece went on really well. Color me impressed, these glue sheets are super sticky! All the other main sheets(6) went down easily.
  I laid full sheets across the top and bottom of my puzzle, thinking that those would be the areas needing the most support. This left a strip down one side and one down the center that still needed glue sheets. The uncovered areas were all under 2″ wide, so I cut 2″strips from two additional glue sheets. Ha! I was able to cover my puzzle completely using only eight sheets instead of the estimated eleven. I still have four sheets to use if I want to save one of my micro puzzles.


 Zane tests the box for sits as Teedle warms my spot.
 This is a new brand to me, and I was really impressed. While there were a few pieces that weren’t fully separated during the cutting process, the overall quality of this puzzle is excellent. The irregularly cut pieces, mixed with traditional ones, made for a fiendishly clever puzzle.
  Featuring nearly 30 sharks from over 25 different species; this puzzle is almost more educational than Shark Week! Better yet, my FAVORITE shark is on it.
 All finished, and beautiful!
 Hurricane gave it the Cat Seal™ of approval as Zoomie supervises.